The Chiba System
I love making gum and casein prints. I don’t love that they both rely on dichromate (a form of hexavalent chromium) – a known carcinogen and a suspected mutagen.
So I was very interested to read Halvor BjørngaÌŠrd’s little-known 2007 paper, “The Chiba System åƒè‘‰æ–¹å¼: a non toxic alternative to the dichromate processes.” In it, Bjoerngaard talks about using ferric ammonium citrate (“FAC”, the same stuff that’s used in cyanotypes) as a sensitizer for carbon printing, and then talks through a gum bichromate variant as well.
The short version is that you can use gelatin instead of gum arabic; FAC instead of ammonium dichromate; and then develop in hydrogen peroxide before washing in water.
I understand a little of what’s happening there, largely because of my work with cyanotype, coupled with an ongoing discussion with one of my co-workers about using hydrogen peroxide as a developer. (He has a minor obsession with hydrogen peroxide and vanillin for inclusion in some alt-photo processes, and I’d love to work out something along those lines one day.) The FAC reduces to ferrous ammonium citrate, when exposed to UV light; the hydrogen peroxide then initiates polymerization (and would dissolve gum arabic before it could polymerize, whereas the gelatin won’t dissolve at room temperature); and then you use hot water to dissolve whatever gelatin hasn’t polymerized (the polymerized gelatin sticks to the paper).
A little research shows that this isn’t really anything new; searching the US patent database shows a number of printing processes that use FAC as a sensitizer and hydrogen peroxide to induce polymerization. I easily found patents as old as 1940 using gelatin, FAC, and “a peroxy compound.” But this isn’t well-known in alt-printing circles (or on internet search engines), and I wanted to know whether or not that was because of quality of the end-product, or just the obscurity of the process.
The only public examples of Chiba prints that I’ve found are in the PDF itself (low quality) and a couple on Flickr. The few I found on Flickr were from one user, and show technical problems that look very similar to those I encountered while working out how to print casein bichromate on glass. So I started printing test charts. Lots of them. I’ve probably printed 50 or so of these now.

In initial experiments, I wasn’t happy with the results from the proportions that Bjoerngaard recommends; I found printing with his measurements (w/w rather than w/v, incidentally) printed (in my setup) too fast. For the prints that would have exposed just the shadows, I found that dark but small areas would wash away. This is probably partly because I’m using PVA as a sizing agent rather than gelatin, and partly because of how I’m working the gelatin. Bjoerngaard seems to mix dry gelatin and dry FAC in to water just before use, whereas I want to use premixed stock solutions – which means re-heating the gelatin just before use.
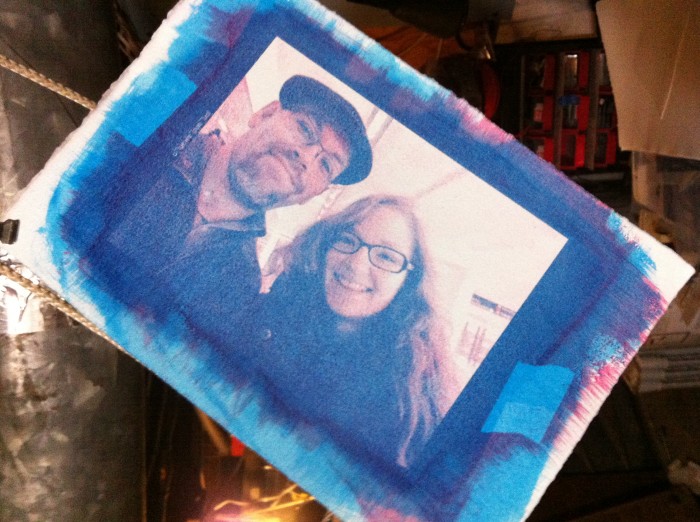
A little (okay, a lot of) experimentation led me to using a stock 5% (w/v) gelatin solution and a 6% (w/v) FAC solution, and I’m starting to get some passable results now. In the image above, the row of 6 test charts across the middle of the picture are at 2, 3, 4, 5, 6, and 7 minutes exposure time; above and below the 5 minute exposure are two that show differences based on how the print is washed in water; and the two darker copies in the lower-left are printed with multiple hits to see how a slightly different formula stacks up to build density. I’ve used all of this to start several test prints of actual photos, all but one of which I’ve abandoned after seeing the first layer.
My current test print has three layers of cyan and two of magenta. I’m using two different mixtures of FAC and gelatin. Mixture “A” is made by mixing 3ml of 5% gelatin (gently warmed) with 2ml of 6% FAC and 0.25g of pigment (Schmincke Helio Cerulean or Windsor & Newton Permanent Carmine). Mixure “B” is made by mixing 3.5ml of 5% gelatin (warmed) with 1.5ml of 6% FAC and 0.15g of pigment.
This first layer is mixture “A” exposed for 5 minutes, rinsed in 3% hydrogen peroxide, and washed with hot tap water:

This second layer is mixture “B” exposed for 6 minutes:

Add mixture “B” exposed for 4 minutes:

My test charts say I should add another 2-minute exposure of mixture “B”, but I’m skipping that for the moment.
After re-sizing with PVA, I added a layer of mixture “B” (magenta this time) for 6.5 minutes. And forgot to take a picture before hitting it with a fifth layer, mixture “B” exposed for 4 minutes:

Clearly, it’s working. I won’t know just how well until I finish at least another 4 layers (1 magenta, 3 yellow). I find that very minor alterations in the proportion of gelatin to FAC makes a huge difference in polymerization. Chiba is much less forgiving than gum printing, but it’s promising enough that I’ll keep at it for a while longer. In particular this is, as Bjoerngaard suggests, much less taxing on the paper which means that I’m seeing less shrinking. Also, since it’s less saturated when it comes out of the water, I can dry a layer (with a hair dryer) in 2-3 minutes and be ready to start the next layer pretty much immediately.
I’m sure I’ll be posting more about my experience with Chiba.
Hi, I am very interested in Chiba system, can I ask you more about this process?
When you apply either mixture A or mixture B, is that when the solution is still warm?
Yes, it has to be warm. The gelatin sets as it cools.
Great work! I’m looking to start making gum prints or use this system myself, so posts are very much appreciated! Currently trying to figure out where to get materials in Scandinavia…
If you can’t find ferric ammonium sulfate (the green stuff, not the brown stuff) then you might be able to make it yourself. It would be 1 mole of ferric hydroxide to 0.65 mole of citric acid. I’ve never done this, but it shouldn’t be too difficult – once you’ve got a suitable powdered form of ferric hydroxide (C.I. 77492, Pigment Yellow 42 as a food additive, perhaps even pulverized hematite if you’re really desperate) which might be just as much of a challenge…
Thanks 🙂