Cyanotype

Next week, I’ll be teaching a room of 4 and 5 year olds a little bit about film photography. I’ll be giving them disposable cameras to shoot with, and figured I’d build a Camera Obscura to show them what’s going on inside the camera (and why they can’t see the picture as soon as they snap the shutter). I had been thinking about how I could load it up with some sort of film that didn’t require a toxic developer, when a co-worker reminded me about “Sun Print” paper. This stuff is some form of cyanotype, reasonably insensitive to light (and therefore easy to handle), and develops in water.
So this weekend, I’ve been building things and testing with Jake. We built a camera obscura (using a pair of drug-store +2.00 reading glasses to make the image brighter than a pinhole camera – focal length 20″) and a quick test showed that there was no way I was going to get any cyanotype reactivity in a reasonable length of time; math shows it’s about an f/22 camera, with the paper guesstimated somewhere around ISO 12.
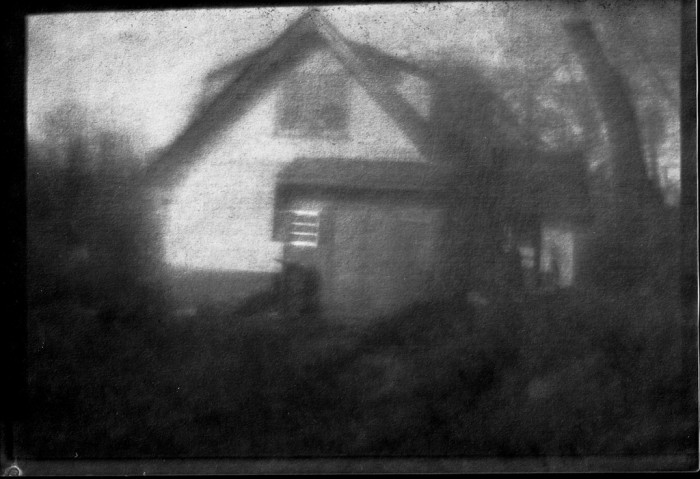
So I found the biggest (cheap) lens I had in the house with the largest area: a Barnes and Noble 4×5 reading magnifier. Focal length, about 6″. This is the result of a 1-hour exposure with the subject (our house) in full sun. I developed it in water with a little vinegar, scanned it, and pulled out a little more detail in Photoshop (would have done it all in Lightroom, but Lightroom 2 doesn’t have an invert feature).
List of materials:
- One cardboard box (a MacBook outer shipping box, 6″ deep)
- A 4×5 fresnel reading magnifier (mine was B&N several years ago, appears to be discontinued)
- One pack of 4×6 “Sun Art” (got mine via Einstein’s Toolbox)
- Gaffer’s tape
- Utility knife
I used the acrylic holder from the Sun Art paper to hold the film flat on the back of the box. The hard line on the right edge of the photo is gaffer’s tape, holding on the acrylic. The line across the bottom is the edge of the acrylic. And the spot in the lower-left is from the hemostats that I used to pull the film and hold it while dipping.
On the opposite flat side of the box, I cut the 4×5 hole for the lens. I actually cut about a half inch shy on each side, and folded the cardboard into the interior; the lens is mounted to the flaps and can be moved in and out a little bit to aid focusing. It’s neither sturdy nor precise.
I taped an envelope over the front as a shutter, and another over the film. Took it outside loaded with film and both envelopes down – opened the box, opened the shutter, composed the shot (projected on the inside envelope). Closed the shutter, removed the inside envelope, taped the box shut. Then opened the shutter and waited an hour. All of this is, of course, overkill for this “film”; the results would probably have been identical without the precautions.
The developing took a little practice to rinse the cyano-whatever off effectively. I started with a flat plate, but found that it tended to pool on the opposite side, leaving streaks as I removed the paper from the water. Vinegar also helped pull the image out a bit better (perhaps 5% solution, and white vinegar). I found that a very tall container worked better with a dip process.
Some of the previous attempts, where you can see either streaks (from improper washing) or patterns (from paper towels – don’t use paper towels to dry) are here, here, and here.
Hi, Jorj–Anne sent me this. I just love it. Not only the magic of it working, but the vague mystery of the photograph. I remember sun paper from childhood. It was a favorite thing. I hope you explore this a little more, not only for the kids, but to see what you yourself can do with it. Do keep me up to date. Or else she will.
Also, wanted to thank you for sending me all the Scottish photographs. Unfortunately, I lost them in a computer meltdown caused by Malware. (However, yes, I suspected that was the Great Glen, but asked because none of the pix were labeled so I couldn’t be sure.)
Please use email address only for you.
All best,
Cara
Thanks for the words of encouragement, Cara! I’m done with the cyanotypes for the moment, but hope to come back around to it again when the weather is better. I’m thinking that I’ll give this rig another try someplace a bit farther away from home…
Somehow I’m not at all surprised that you would have a pair of hemostats lying around the house. I read this with some interest.
Heh. My grandfather was a physiologist, and I have a number of odd medical instruments lying around. We actually have three different pairs of hemostats lying around the house. Two are generally used for electronics work (one has a finer tip than the other). The third has a better story.
One Thanksgiving, Sue bought a kosher turkey. They’re pre-brined. So far, so good. T-day arrives and we start prepping the bird to pop in the oven and… it still has pin feathers. Sue and I used a pair of hemostats to pull them all out.
So she asked me for a pair for the kitchen. 🙂